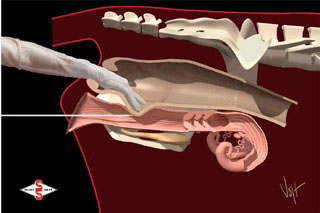
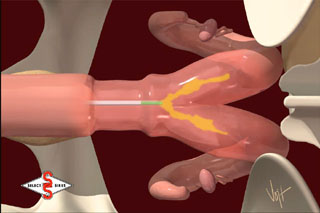
| Figure #1: Keeping the gloved hand even with the tip of the inseminator gun. |
More Beef Info, More Dairy Info
BUY THIS MANUAL NOW and have access to this article and 100's of others just like it!
View some of the 15+ Video clips found in the Beef and Dairy Manuals
Type of breeding method
(AI - artificial insemination vs. live coverage):The benefits of each method will be discussed below:
AI Bred
* For additional information on reproductive management issues, refer to A308.
Artificial Insemination Technique:
Introduction:
The recto-vaginal technique is the most commonly used method of artificially inseminating (AI) cattle. The basic skills required to perform this technique can be obtained with about 3 days practice under professional instruction and supervision. Additional proficiency and confidence come with time and practice. Regardless of whether the inseminator is left or right handed, it is recommended that the left hand be used in the rectum to manipulate the reproductive tract and the right hand be used to manipulate the insemination gun. This is because the rumen or stomach of the cow lays on the left side of the abdominal cavity, displacing the reproductive tract slightly to the right. Thus it may be easier to locate and manipulate the tract with the left hand.Step #1
: Restrain the animal to be inseminated. There are several things that should be kept in mind when choosing a location for inseminating cattle. Some of these include safety of both the animal and the inseminator, ease of use, and shelter from adverse weather. A gentle pat on the animal’s rump or a soft spoken word as the inseminator approaches will help to avoid startling or surprising the cow.Step #2
: Raise the tail with the right hand and gently massage the rectum with the lubricated glove on the left hand. Place the tail on the back side of the left forearm so it will not interfere with the insemination process. Cup the fingers together in a pointed fashion and insert the left hand in the rectum, up to the wrist.Step #3: Gently wipe the vulva with a paper towel to remove excess manure and debris. Be careful not to apply excessive pressure which may smear or push manure into the vulva and vagina. With the left hand, make a fist and press down directly on top of the vulva. This will spread the vulva lips allowing clear access to insert the gun tip several inches into the vagina before contacting the vaginal walls.
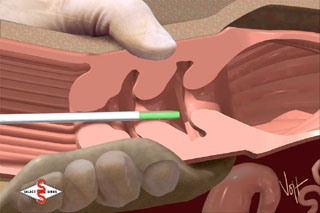
Step #4: Insert the gun at a 30° upward angle to avoid entering the urethral opening and bladder located on the floor of the vagina. With the gun about 6 to 8 inches inside the vagina, raise the rear of the gun to a somewhat level position and slide it forward.
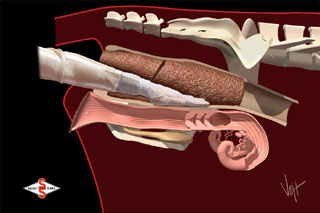
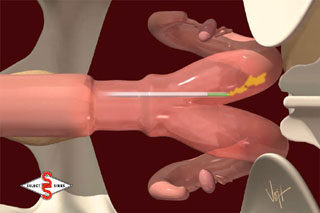
To become a successful inseminator, it is very important to always know where the tip of the insemination gun is located. The walls of the vagina consist of thin layered muscle and loose connective tissue. The insemination gun can be easily felt with the left hand in the rectum. As the breeding gun is inserted into the vagina, keep the gloved hand even with the gun tip (Figure #1). Manure in the rectum can often interfere with the inseminator’s ability to palpate the cervix and gun tip. However, it is seldom necessary to remove all the manure from the bowel. Instead, keep the open hand flat against the floor of the rectum, allowing the manure to pass over the top of the hand and arm (Figure #2).
|
|
 |
|
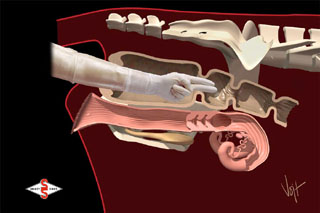
With the hand in the rectum, the inseminator may notice colon constrictions or "rings" attempting to force the left arm from the cow. To relax these rings, place two fingers through the center of a ring and massage back and forth. The constriction ring will eventually relax, pass over the hand and arm, and the inseminator can continue the palpation process (Figure #3).
 |
|
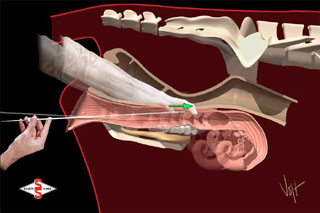
Because the reproductive tract is freely movable, cows that have strong rectal and abdominal contractions in response to being palpated may actually push their reproductive tract back into the pelvic cavity. This will cause many folds to form in the vagina. In such cases, the insemination gun can get caught in these folds and little or no progress will be made until they are removed. If the cervix can be located, grasp it and gently push it forward. This will straighten the vagina and the gun should pass freely up to the cervix (Figure #4). The inseminator will note a distinct gristly sensation on the gun when it contacts the cervix.
 |
|
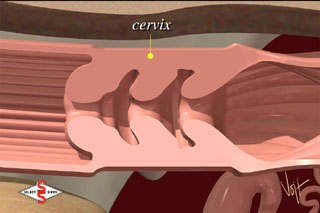
The cervix (Figure #5) consists of dense connective tissue and muscle and is the primary landmark for inseminating cattle. It has often been described as having the size and consistency of a turkey neck. The size will vary, however, with post partum interval and age of the animal. The cervix usually has three or four annular rings or folds. The opening into the cervix protrudes back into the vagina.
 |
|
In most cows, the cervix will be located on the floor of the pelvic cavity near the anterior (front) end of the pelvis. In older cows, the cervix may rest slightly over the pelvic bone and down into the abdominal cavity.
BUY THIS MANUAL NOW and have access to this article and 100's of others just like it!
Step #5: Once the gun is in contact with the external surface of the cervix, the inseminator is ready to begin threading the cervix over the end of the gun. Place the cervix on or over the insemination gun; the gun is not passed through the cervix. Excessive movement or probing with the insemination gun during this step is seldom productive. The key to mastering this step of the insemination process is knowing how to hold and manipulate the cervix and concentrating on doing the work with the hand inside the cow, not the one holding the gun. When the gun first contacts the cervix, the inseminator will usually find that the tip is in the fornix area directly over the top of the opening of the cervix. If this happens, grasp the external opening to the cervix with the thumb on top and forefingers underneath (Figure #6). This closes the fornix at top and bottom. It is also still important to know the location of the gun tip. This is accomplished by contacting the gun tip with the palm and 3rd and 4th fingers of the hand in the rectum. Use the palm and these two fingers to guide the gun tip to the cervical opening located between the thumb and forefingers. With gentle probing, the opening of the cervix should be located. The inseminator will feel the gun slide forward until it contacts the second cervical ring.
 |
|
Step #6: Maintain gentle but steady forward pressure on the gun and slide the thumb and forefingers just in front of the gun tip and re-grasp the cervix. Because the cervix is composed of dense connective tissue and muscle, it is difficult to clearly distinguish the gun tip when it is located within this structure. However, the inseminator can determine the approximate location by bending the cervix. Using the flexibility of the wrist, gently twist and bend the cervix until the second ring of the cervix slides over the gun tip (Figure #7). Repeat the process until all the rings have been passed over the gun tip. Remember, the cervix is being placed over the gun, not the gun through the cervix. For the most part, gentle forward pressure is all that is necessary and gun movement should be minimal. When all rings of the cervix have been cleared, the gun should slide forward freely with little resistance. Since the uterine wall is very thin, the inseminator will once again be able to feel the tip of the gun.
 |
|
Step #7
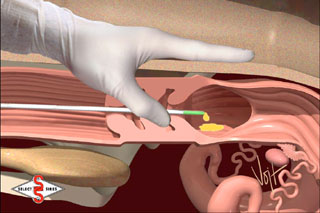
: It is now time to check the gun placement and deposit the semen. Rotate the gloved hand until it lies on top of the cervix. With the index finger of that hand, locate the far end of the cervix (Figure #8). Pull back on the gun until the tip of it is directly underneath the index finger near the internal opening of the cervix. Raise the finger and slowly deposit the semen (Figure #9). Push the plunger slowly so that drops of semen fall directly into the uterine body.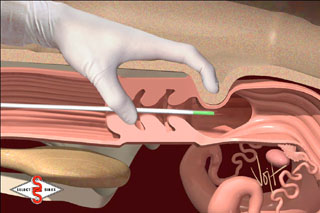 |
|
 |
|
With proper AI technique and gun placement, semen will be deposited in the uterine body. Uterine contractions will then transport spermatozoa forward to the horns and oviducts with a good distribution of both sides (Figure #10). When the insemination gun is more than 1 inch through the cervix, all the semen will be deposited in only one horn (Figure #11). Be sure to raise the index finger after checking gun placement. Not doing so may obstruct one horn, creating a situation of uneven semen distribution. When checking gun tip placement, be careful not to apply excessive pressure. The delicate uterine lining is easily damaged, potentially causing infections and reduced fertility.
 |
|
 |
|
Make sure to push in with the plunger and do not pull back on the gun. Pulling back may result in much of the semen dose being deposited in the cervix and vagina instead of the uterine body. Although the recommended site of semen deposition is in the uterine body, research suggests that when exact gun tip placement is in doubt, depositing semen slightly into one uterine horn is less likely to compromise fertility than depositing it in the cervix. However, if the cervical mucous of a cow that has been previously inseminated feels thick and sticky on the gun, the cow may be pregnant. In this case, deposit the semen about halfway through the cervix.
Step #8: After properly depositing semen, slowly pull the gun from the reproductive tract. Remove the gloved hand from the rectum. Check the gun tip for signs of blood, infection or semen leakage inside the sheath. Make the necessary notes for future reference and for the local veterinarian. Remove the sheath from the gun and hold it in the gloved hand. Check again to see which bull was used. Remove the glove starting at the top of the arm by turning it inside out trapping manure, the sheath, and dirt inside. Dispose of the used glove in a proper receptacle. Wipe the gun clean and dry and return it to the proper storage location.
Some of the most important aspects to remember when inseminating a cow include the following:
Correct insemination procedures will result in better breeding efficiencies. More selection pressure can then be placed on economic traits such as milk and beef production, enabling a higher return on semen investment dollars.
All of the pictures and text were used with permission from Select Sires, Plain City, OH 43064. Phone # 614-873-4683.
BUY THIS MANUAL NOW and have access to this article and 100's of others just like it!
More Beef Info, More Dairy Info
View some of the 15+ Video clips found in the Beef and Dairy Manuals