F113
Calving Problems (Dystocia)
Introduction:
A basic understanding of
the stages, progression, and positions of a normal birth is essential.
- Stage 1:
- Visible signs of early labor may or may not be seen in mature cows.
First calf heifers are more likely to show signs such as wanting
isolation, discomfort, uneasiness, kicking, and wringing the tail. There
may also be some vaginal discharge and obvious uterine contractions.
- This stage lasts 2-6 hours and may be longer in heifers.
- Stage 1 ends with the fetal parts entering the birth canal.
- Stage 2:
- Visible signs of second stage labor include appearance of the water sac,
and evidence of a foot or leg.
- This stage lasts from ½ to 4 hours.
- Stage 2 ends with birth of the calf.
- Stage 3:
- This stage is where the placenta or fetal membranes are passed.
When to give assistance:
- If an animal is in stage 1 of labor for longer than 8 hours.
- If in stage 2, any of the following occurs:
- The cow has been straining for 30 minutes with no progress.
- The water sac is observed for longer than 1 hour and the animal is not
trying to push.
- The animal is showing signs of severe distress or fatigue, including
bleeding from the rectum of the cow or a swollen tongue of the calf.
- It can visually be determined that the calf is coming in an abnormal way.
(You see 3 or more feet, the tail, etc.)
- If the fetal membranes have not passed within 12 hours after delivery.
Once it has been determined that an animal is having difficulty, the
following steps should be taken:
- Clean the vulva, anus, and surrounding areas with dilute Chlorhexidine (Nolvasan)
or soapy water, removing all dirt and manure. Begin soaking sleeves and
equipment in a bucket of dilute Chlorhexidine.
- Determine the presentation, position, and posture of the fetus. This can
be aided by referring to the following descriptions and pictures.
- Presentation - This refers to whether the calf is coming head
first, backwards or sideways.
- Position - This refers to whether the calf is right-side up or
upside-down.
- Posture - This refers to where the calf’s legs are in relation
to its body.
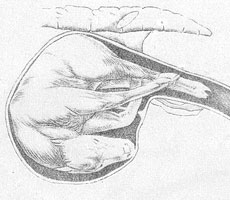
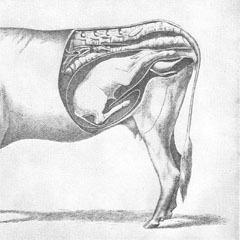
- The normal presentation, position, and posture is a calf coming head
first, right-side up, with the front legs and head coming through the birth
canal. See figure 1.
|
| Figure 1 |
- It should be determined if the front or hind legs are coming through the
birth canal. This is done by understanding that the joints on the front limbs
flex in the same direction. The joints on the hind limb, however, flex
opposite of each other. In the case of twins, any combination of front and
hind limbs may be present.
- One of the criteria for making a plan of action involves determining if
the calf is alive or dead. This is done by:
- Pinching between the toes and having the calf pull away.
- Placing a finger in the mouth and feeling the calf suckle.
- Gently poking the eye - the calf usually moves its head.
- Checking rectal tone by placing a finger in the rectum - the tissue
around the finger should contract.
Note:
- A dead calf may be more easily removed by having a veterinarian perform
a fetotomy. This method may also be safer for the cow.
- A dead calf, if not removed within hours, will severely compromise the
health of the mother.
- Severely swollen, fluid filled calves usually require professional help
to remove.
- A weak, yet live calf, needs fast removal. This may mean a Cesarean
section.
- Immediately seek professional help if any of the following arise:
- No progress is made with 30 minutes of skilled effort to correct the
problem.
- After a few attempts, the exact presentation, position, and posture
cannot be determined.
- The calf is dead, swollen and/or dry, with the uterus contracted
around the body of the calf.
Routine Deliveries
Delivery of a calf in normal presentation, position, and posture using
chains/handles or a calf puller:
- Clean the vulva and surrounding area and use a lubricant (J-Lube, etc.).
Use sleeves and equipment soaked in Nolvasan (Chlorhexidine) on both arms
to reduce contamination. Additional suggestions are found on the following
page.
- Chains or straps should be placed on both front legs with one loop of
the chain/strap above the first joint (fetlock) and a half hitch between
the fetlock and the hoof.
- If the cow is down, traction should first be placed on the calf’s
lower limb (If the cow is standing, place traction on either limb). The
shoulder of this limb should be pulled through the birth canal. Oftentimes
it is possible to feel the shoulder come through the birth canal or note
that the first joint (fetlock) is about one hand width outside of the
vulva. Traction should then be placed on the opposite leg and the shoulder
pulled through the birth canal. If the second shoulder cannot be pulled
into the birth canal, a Cesarean section may be necessary.
- Once both shoulders are through the canal, pressure can be placed on
both limbs and the calf pulled until the chest is outside of the cow’s
pelvis. Frequently, this is where the umbilical cord is compressed and the
calf struggles to breathe. The cow often takes a break at this point.
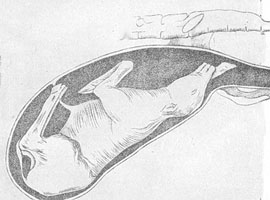
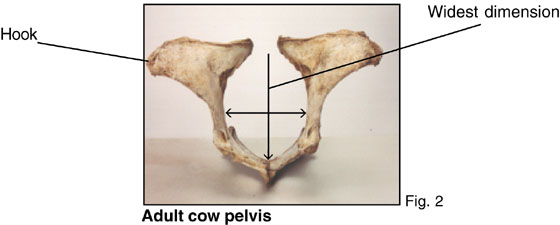
- If the calf is fairly large, it should be rotated 45-90 degrees,
allowing the widest part of the calf (the hips from side-to-side) to pass
more readily through the widest part of the mother’s pelvis (see figure
2). Rotation of the calf is accomplished by crossing the legs and applying
pressure to the upper limb and body while rotating.
- When pulling the front legs and head, the
pressure should come from directly behind the cow in a slightly downward
direction. If the calf has been rotated to remove the pelvis, the pressure
should be applied in a slightly upward direction toward the tail of the
mother.
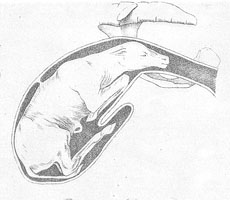
Delivery of a calf that is
coming backward, but in normal position and posture:
- Because the head of the calf is immersed in fluids during the delivery,
the calf must be delivered quickly to avoid suffocation.
- The calf should be rotated 45-90 degrees before attempting to remove it.
- Traction should be applied from directly behind the cow in a slightly
upward direction (towards the tail of the mother) until the calf’s hips
are removed.
- At this point the calf can be rotated back to normal and removed
routinely.
Abnormal Presentations, Positions, and Postures
- All chains, straps, sleeves and equipment should be sterilized in
Nolvasan (Chlorhexidine) for at least 10 minutes before use.
- Extreme traction from more than two people pulling on each leg or
improper use of a calf puller may cause severe damage and even death to
calf and mother!
- All traction placed on the calf should coincide with the mother having a
contraction and pushing.
- If manipulations need to be performed, it is very beneficial to have a
spinal block (epidural) administered. Consult a veterinarian for
specifics.
Normal presentation and position, except one or both front legs are retained:
- With one hand, try to cup the end of the hoof on the leg(s) that is
retained. This will protect the uterus and allow the limb to be pulled
towards the pelvis. Sometimes a chain can be placed on the retained limb
for extra control.
If more space is required, one hand can be placed on the chest or head of
the calf. Then while pushing the calf back into the pelvis, the other hand
can be used to cup and pull the retained limb into the pelvis.
Two front legs are coming through the pelvis, but the head is turned back:
- The head can be turned to either side, straight behind or even down
between the legs.
- A calf in this position is often dead or very weak.
- Once the position of the head is identified, the head should be grasped.
Oftentimes, gently placing your fingers in the eye sockets or mouth will
help give some control. The head can then be gently manipulated into the
proper position.
- For extra control, a head snare or a loop of sterilized rope can be
attached to the calf’s mouth and around the pole of its head.
- It may also be necessary to push the calf’s body back into the uterus
with one hand while positioning the head with the other. This allows that
little bit of extra room that is often necessary.
Normal presentation, but
upside down and leg(s) retained:
- Both front legs should be identified and pulled out of the vagina using
the techniques found in the previous pages.
Once the legs are accessible, the calf is rotated to normal position by
crossing the legs and placing pressure on the upper leg and shoulders, while
rotating.
The head should also be held and rotated along with the body.
Once the calf is properly positioned, it can be removed routinely.
Backward presentation and upside down:
- Same as above once both legs are accessible.
Backward presentation, both legs retained (breech):
- First, pull the hock of one leg into a flexed position.
Then, take one hand and force that hock upwards and forward.
The other hand is used to cup the hoof of that leg and pull the foot towards
the middle of the calf and backwards.
Often, it is helpful to use an arm or a sterilized toilet plunger to push
the rump of the calf back, while trying these manipulations.
The same technique is used to reposition the opposite leg.
Once both legs are exposed the calf can be delivered routinely.
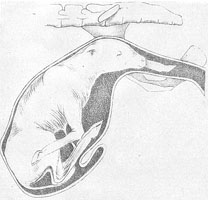
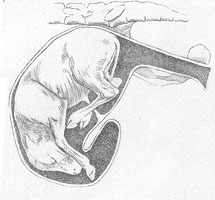
Four Legs in the Birth Canal:
- Make sure the legs are all from the same calf.
If all 4 limbs are from the same calf, deliver the hind legs first.
Delivering the hind legs first will allow the head to follow naturally. (The
calf in the above picture should probably be delivered head first.)
Rotate the calf if necessary, using the information found on the previous
pages.
Delivering Twins:
- Identify the limbs associated with each calf. (Many times one comes
backward and one head first).
- Try and remove the calf coming backward first, unless one calf is
definitely in front of the other.
- It may be necessary to push one calf back, while removing the other.
Common Mistakes:
- Allowing the cow to be in labor too long before giving assistance.
- Check cows often. Intervene if no progress is being made.
- Trying to deliver a calf that is in an abnormal position without first
correcting the problem. Never apply traction to a calf with the head or leg
back without first correcting the problem.
- Applying too much traction. No more force than the equivalent of two
people manually pulling should ever be used.
* When questions arise, consult a veterinarian!